Can You Cut Govee LED Lights? – Solved!
If you are wondering “can you cut govee LED lights“, then in the post, we are going to reveal the answer, please read on.
By taking the aforementioned safety measures, you can cut Govee LED lights. After cutting your Govee LED lights, you can join them together with connector kits, a soldering iron, and wires.
So, there is no harm in experimenting with different The majority of available brands of LED light strips offer their owners a respectable value, and you can read customer reviews to get a better idea.
If you’re not trying to go over budget, Govee is among the best entry-level options. The ability to cut these LED lights to size is a common worry, though.
Therefore, the information that follows is for you if you’re also hesitant to cut Govee LED lights.
Table of Contents
What Are Govee LED Lights?
A well-liked form of energy-efficient lighting are Govee LED lights. They are frequently applied in both domestic and professional settings. Govee LED lights offer many benefits over traditional incandescent bulbs, including:
- Lower energy usage—Govee LED lights use up to 90% less energy than incandescent bulbs, which lowers electricity costs.
- Longer lifespan: Govee LED lights have a 50,000-hour lifespan, compared to an incandescent bulb’s 1,000 hours.
- Enhanced toughness: Govee LED lights are more vibration- and break-resistant than conventional bulbs.
- An increase in safety is provided by the fact that Govee LED lights produce very little heat, making them safer to use in homes with young children or animals.
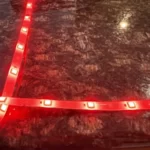
Can You Cut Govee LED Lights?
Most of the Govee LED strip is equipped with cut lines that are visible and help to produce straight lines. Nevertheless, you must adhere to the markings. Cutting outside of the advised limits could damage the strip as a whole or interfere with the circuits. Additionally, you can connect the strip using connector kits, a soldering iron, and wires. This technique is more flexible and lets you create any shape.
Use a sharp pair of scissors or a knife to cut your Govee LED lights if necessary. Avoid using sharp objects as they might harm the lights. Govee LED lights can be easily cut to size, allowing you to easily alter the length of your light strips to suit your requirements. Use either a pair of razor-sharp scissors or a sharp knife to cut Govee LED lights. Avoid using sharp objects because they might harm the lights.
Cutting outside of the advised limits could damage the strip’s circuits or even cause it to fail altogether. Additionally, you can connect the strip using connector kits, a soldering iron, and wires. You can create any shape using this method, which is more flexible.

Is It Safe?
As long as you adhere to the recommended instructions, cutting your Govee LED light is safe. Govee LED lights are made to be cuttable, so you can easily alter the length of your light strips to suit your needs. Use either a pair of razor-sharp scissors or a sharp knife to cut Govee LED lights. Avoid using sharp objects because they might harm the lights.
The main benefit of most LED lights is that, regardless of the type of strips you want, you can cut them to any size. Additionally, they can help you stay focused and upbeat while lifting the spirits of the elderly. Every LED light has a regular pattern of dotted black or straight lines running through it. Due to the fact that circuits are closed there, these are the best places to cut your LED strips without risking damage.
How to Cut Govee LED Lights?
Govee LED strips are designed to be as simple to cut as possible. LED light strips are intended to be cut to any length you desire. Using Govee LED lights effectively requires knowing where to cut them. Every two or three LEDs on each strip, there are distinct cutting points that are easy to see. Copper dots on either side of the cut line will encircle it. Here’s what you want to do:
- Choose the length you want for your strip and take a measurement of it. Cut off a brief strip to test on if you want to practice first.
- As precisely as you can, cut the line between the copper dots using sharp scissors or a box cutter. Avoid cutting the copper dots directly because doing so will prevent the LED strip from being powered as a whole.
There is nothing else to say; that is it. Again, if you’re unsure of how sharp your scissors are or you’re concerned that you’ll make a mistake, test on a small piece first.
Read about Can You Cut LED Strip Lights?
How Do LED Strip Lights Work When Cut?
These LED strip soldering procedures are straightforward. They can be divided using a pair of scissors. Two pairs of copper dots are attached to the end of each LED. If you cut between the dots, all of the LEDs will turn on. You can then choose between using a quick link or soldering to connect the LEDs to a power source, depending on your preference.
As an illustration, when you cut an LED light strip, the copper tracing that completes the circuit is also cut. The LEDs on either side of the cut will no longer function as a result. The circuit will be finished and the LEDs will resume functioning if you solder the two ends of the cut strip back together.
You can see that it’s secure and simple to cut your Govee LED lights. Just make sure to avoid using blunt objects and only use sharp scissors or a knife. The length of your light strips can be easily adjusted to suit your needs because Govee LED lights are made to be cuttable. Always use sharp scissors or a knife to cut Govee LED lights. Avoid using sharp objects because they might harm the lights. Additionally, you can connect the strip using connector kits, a soldering iron, and wires. More shapes can be created using this method, which is more flexible.
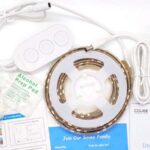
How to Connect Govee Lights Together?
Once you have a LED lightstrip that is the right length, you should connect it to a power source and install it where you want it. The more difficult part of the process is this, but it’s also very doable. There are basically two approaches to it.
Using a Quick Connector
Simply using a quick connector is the fastest, easiest, and simplest course of action. Simple devices known as quick connectors are available at any hardware store and can be purchased along with Govee or other LED lights. Connecting the copper dots on the LED strips to the electrical circuit in this manner is very simple. Here’s what you’d do:
- Remove the plastic bar from the quick connector by pulling it 1/8 inch (0.32 cm) apart. It’s typically at the connector’s end and is black. Just pull it forward; it’s delicate, so be careful.
- Find the + and – symbols on the LED strip’s reverse, on the copper dots’ other side. Two wires, one black and one red, should be present on the connector. Place the red wire next to the + sign and the black wire next to the – (minus) sign.
- Peel the 1&fra;4 in (0.64 cm) adhesive backing off the LED. Just pull it back far enough to reveal the connector’s copper terminals. If the terminals are covered in plastic rather than having an adhesive backing, carefully cut the plastic off with a box cutter.
- Connect the quick connector to the copper dots on the LEDs.
- Replace the quick connector over the plastic LEDs bar.
- Use a terminal wire connector to join the quick connector’s wires to a power source. You can purchase one at any hardware store if you don’t already have one. In the terminal wire connector, place the black and red wires in the appropriate slots. Simply tighten the wires into place by turning the connector’s screws in a clockwise direction. It only needs to be plugged into a power source.
Soldering the LEDs Together
You could try soldering the LEDs together if you don’t want to use a quick connector. In almost all circumstances, we advise using a quick connector, but soldering can also be used to accomplish the same goal without one. Here’s what to do:
- Take off the copper dots’ plastic or adhesive backing from the LED strips.
- In the hardware store, purchase a soldering iron, and heat it. Next, place a metal solder wire over the copper terminals of the LED strip. With the soldering iron, melt the solder wire over the copper dots. Only enough wire should be melted to form tiny puddles of metal covering the copper dots on the LEDs.
- Visit a hardware or home improvement store to purchase a plastic end cap. Use a box cutter to make a small hole in it large enough to accommodate a few wires.
- To whatever length you require, cut the black and red wires, and then feed them through the plastic end cap’s hole.
- Strip the ends of the wires by a half-inch (1.3 cm) using wire strippers. Wire strippers are available from any hardware store.
- To gather the frayed strands together, twist each wire’s end. Then melt solder onto the exposed wires using the soldering iron once more.
- To attach the wires to the metal you’ve already soldiered over the copper terminals of the LEDs, match the polarity of each wire (black with the minus sign, red with the plus sign, etc.).
- Join the wires to an electrical source. You can twist the wire ends and use an end cap or shrink tube to cover them if you don’t want to use a terminal wire connector.
- To make the connection between the wires and the LEDs safe to touch, glue another plastic end cap over it. You can use silicone glue for that; it won’t affect the electrical connection.
The lights should now be tested; if they don’t illuminate, the wires were probably connected improperly. That is unlikely, but leaving exposed wires is a more frequent issue. Exposed wire connections should always have plastic end caps glued over them to prevent accidents.
What Safety Precautions to Follow?
It’s crucial to adhere to a few safety guidelines when cutting Govee LED lights. A sharp knife or pair of scissors should be used first. Avoid using sharp objects as they might harm the lights. Additionally, make sure to cut on the dotted line. By doing this, it will be possible to reconnect the lights without having to worry about the circuit being damaged. Third, refrain from making extreme cuts.
Cutting outside of the advised cutting lines may harm the lights and render them useless. fourth, after cutting your If you want to connect two Govee LED lights together, you can do so with connector kits, soldering equipment, and wires. More shapes can be created using this method, which is more flexible. You can make sure that your Govee LED lights are safe to use and long-lasting by adhering to these safety precautions. Enjoy your Govee LED lights and thanks for reading!
So, Can You Cut Govee LED Lights?
When you’re having trouble with the Govee light strips, keep in mind some of the more typical things listed above. When cutting and reconnecting the Govee lights, you almost never have to worry about anything.
In contrast, try contacting the dealer if you’re unsure about the lighting condition.
There are some models from the Govee brand that can’t be cut. So it would be best if you didn’t experiment with these options if you were using older models without cutting marks.
On the other hand, if you’re sure that there are visible cutting marks on the unit, then you can cut these lights pretty easily.
All that matters is whether the cutting marks are present, and consulting the manual will help you confirm the cutting method further.
Complete instructions on how to set up and connect multiple lighting strips can be found. Just make sure you don’t go overboard with the lighting setup and stick to the suggested length.
When attempting to correct system errors caused by power issues, that will typically be it..
I hope the process of trying to set up the Govee lights won’t be any more difficult for you.


![9 Best Boat Dock Lighting Ideas In 2022 [Updated]](https://www.totallylight.com/wp-content/uploads/2022/09/9-Best-Boat-Dock-Lighting-Ideas-In-2022-Updated-150x150.jpg)