How To Set Outdoor Lighting Timer? A Step-by-step Gudie
First, how to set outdoor lighting timer?
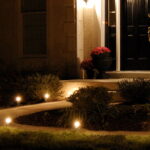
If you’re like most people, you want to come home to a brightly lit house after running errands or going to work. You don’t want to use unnecessary amounts of electricity by leaving your lights on all day. What then is the remedy? an outdoor lighting timer! It takes only a few minutes to set up an outdoor light timer.
see How To Set Outdoor Light Timer.
Table of Contents
What Is A Timer For Outdoor Lighting?
Your outdoor lights can be automatically turned on and off at predetermined times with the help of an outdoor light timer. An outdoor light timer can help you save money and energy while also enhancing your home’s security. When selecting an outdoor light timer, there are a few factors to take into account, including the type of timer, the size of the timer, and the features that you require.
Set The Time On Your Light Timer
- Set the light timer to the appropriate setting, whether it is digital, dial, or smart. If you have a digital timer, set the time for the lights to come on and off using the buttons. If it’s a dial, set it to the appropriate time. Use your phone and the necessary app to operate a smart timer.
- Your timer will typically indicate that it is set once it is. In the event that your timer is digital, it probably flashes on the display. If it’s a dial, you can easily see where you set it and observe how the dial counts down to the desired time. If it’s through a smart device, it ought to be listed in the related website or app.
- Once it has been programmed, check to see if the timer functions and that the lights turn on or off at the appropriate times. You can proceed after it has been confirmed.
- Consult the user manual if you require any additional assistance configuring your light timer.
Plug In Your Light Timer
- The first thing to do is to plug in the wall switch light timer you’ve chosen, whether it’s digital or not. After being plugged in, test your light bulb by turning it on and off to make sure it hasn’t blown.
- Next, if your timer has one, set it to the automatic setting. This will ensure that the timer becomes accustomed to the times that you want your lights on and off. The timer will be sure to understand your schedule if you do this.
- If you’re using a digital light timer, be sure to set it to the right time. By doing this, you make sure the times coincide when you set the timer.
- In the event that you purchased a used timer, turn it off to erase all of the previous timer settings.
See more about Can You Use LED Strip Lights Outdoor?

Outdoor Lighting Timers: Different Types
Timer devices are essential for outdoor lighting. They not only protect your house from intruders by discouraging them, but they also lower your energy costs. But which one is best for you, given the wide variety of options available?
Here is a quick guide to the different types of outdoor light timers available:
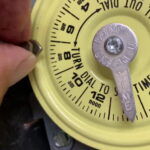
Mechanical Timers
The simplest timers are those that require manual setting of the duration for which you want the light to be on. They are frequently very affordable and simple to use, but they might not be as reliable as other timers.
Digital Timers
You can set specific times for the light to turn on and off with these timers, which are more precise than mechanical timers.
Photoelectric Outdoor Outlet Timer
These have plugs for connecting outdoor lights and an integrated photoelectric sensor that detects the presence of sunlight to automatically turn on or off the outdoor lights.
The majority of models include two to three pugs for connecting the outdoor lights. The timer can also be set to run at various intervals in addition to that. Some sophisticated models might also include a remote. But over time, the sensors might lose their effectiveness, and you’ll need to replace them to make sure the timer keeps functioning properly.
Switch Timers & Smart Switch Timers
These are perfect for outdoor lights with switches. Switch Timers and Smart Switch Timers are switches with a timer integrated into them. Depending on the interval you select, these switches automatically turn on or off the outdoor lighting. You can extend the interval up to four hours and choose from a variety of time intervals between 5 and 20 hours.
If your home has a working internet connection, using Smart Switches gives you the opportunity to turn off the lights from a distance. Voice commands and specific mobile apps can be used to control some switches.
To install the switch timers of smart switches, you must first uninstall any manual switches that were previously installed. You could even hire a skilled electrician to assist you in installing these switches.
Smart Outdoor Lights
Undoubtedly, smart lights with automatic timers are the timers that are most advanced. A home Hub station like Alexa is used by smart bulbs and lights to establish an internal connection to the internet router. As a result, you can dim these lights using just a voice command or a mobile app.
The fact that these lights are available in a variety of sizes, shapes, and colors is their best feature. Consequently, you have numerous customization options. Additionally, you can use the app to remotely turn on and off the lights. Despite the price, these have some great features.
Ways To Install A Timer On Outdoor Lights
Your installation will vary based on the timer type that you intend to use to manage your outdoor lighting. Please be careful and turn off your power before beginning any installation work that requires you to work around exposed electrical wires. Here is a brief explanation of how to set up each choice, beginning with the installation of outdoor outlet timers.
Mechanical and photoelectric outdoor outlet timers can be installed very easily. All you have to do is plug them into a wall outlet and then your lights into the timer. These timers typically have mechanical knobs and/or push buttons that make setting adjustments simple.
Installation Of Switch Timers & Smart Switch Timers
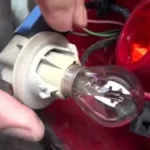
The most physically challenging timer control options to install are smart timers and smart switch timers. Turn off your power first, then install or remove any wall switches. You must first remove your existing electrical switch in order to install wall timers. Here are the basic installation steps:
- Make sure it is off by shutting off the main power. Otherwise, you’ll get shocked, if not worse.
- On your current switch, unscrew the wall plate.
- Disconnect the back wires before removing the wall switch.
- A sufficient amount of bare wire must be available to connect to the new switch. If they are not long enough, you might need to use a wire stripper.
- New timer switch wiring is required. Make sure you connect the wires correctly (green is always for ground, white and black are power)
- To keep the wire connections safe, use wire nuts or electrical tape.
- Installing the wall plate after installing the switch and screws into the wall junction box.
- Allow light to exist by turning on the power!
- Note: If electrical wiring is not something you are familiar with, you might want to hire an electrician or enlist the assistance of a friend with more expertise.
Conclusion
To set an outdoor light timer, choose the right timer for the light, install it according to the instructions, and test the timer before leaving the light on for an extended period of time. These steps will help you make sure that your outdoor light turns on and off at the appropriate times.
Many thanks for reading.


![9 Best Boat Dock Lighting Ideas In 2022 [Updated]](https://www.totallylight.com/wp-content/uploads/2022/09/9-Best-Boat-Dock-Lighting-Ideas-In-2022-Updated-150x150.jpg)